How to create a drooling cat animation
July 27, 2022 • 4 min read
This is a very simple drooling cat animation created with React, Emotion, and Figma. As the page scrolls down, the saliva gets fixed at the top of the page, giving the impression that the cat is drooling.
Designing in Figma
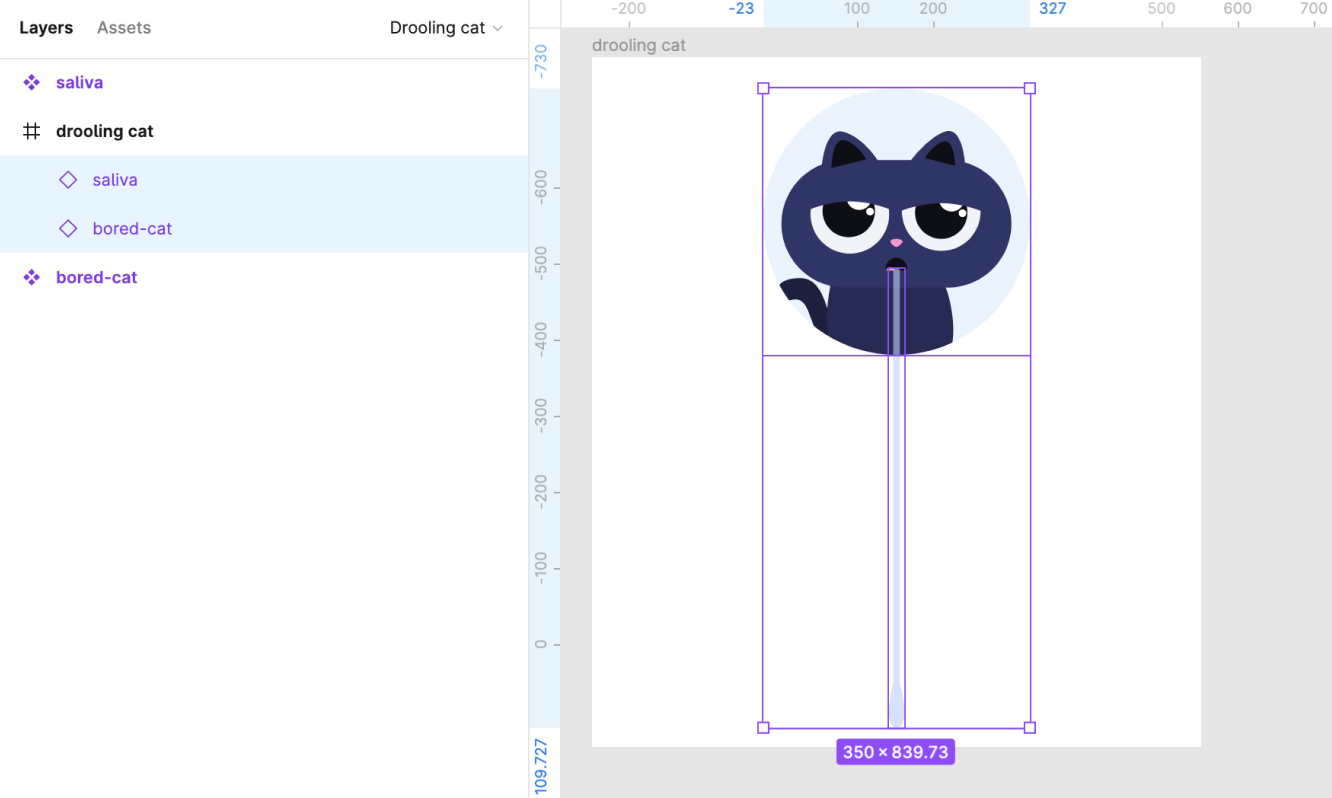
Let's start by designing a cat that is drooling in Figma and then split the image in two: "bored-cat" and "saliva".
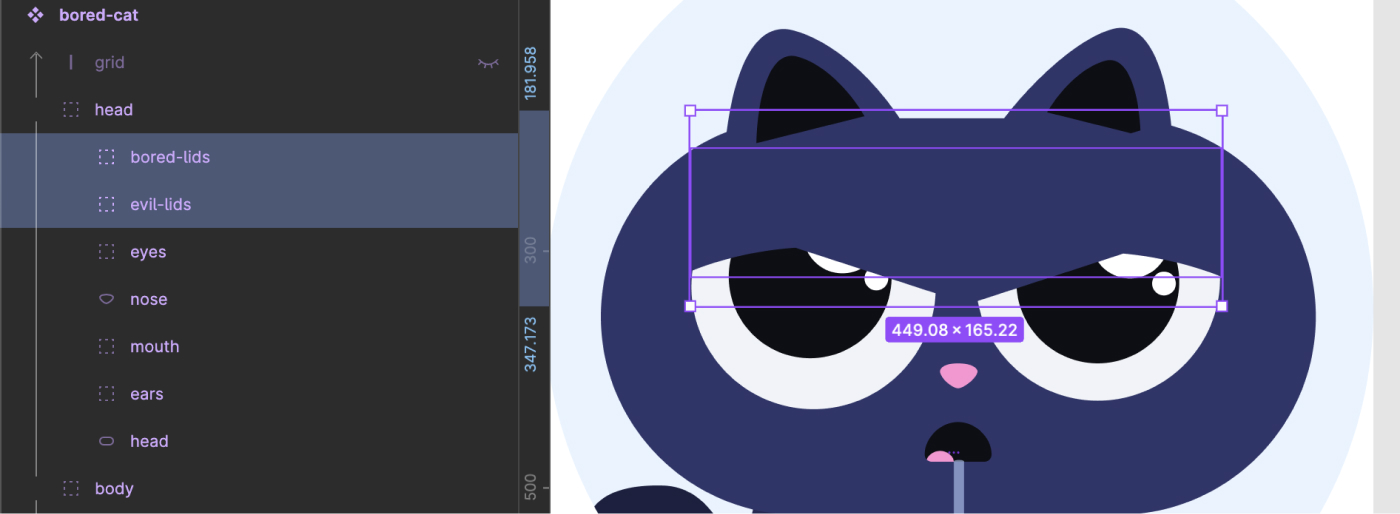
A hover animation would also be nice for the bored cat. Hovering the image will make the cat bored. As you can see in the image below, I am going to group the eyelids into two different groups. One I call "evil-lids" and the other I call "bored-lids". I'm going to leave both groups visible.
We could export the images in two files, but since we want to have some hover animations, let's export them as SVGs as React components. In order to accomplish this, I will use the Figma plugin SVG to JSX.
Coding in React
Using React, I will make a component called DroolingCat. And I'm going to add both SVGs. The first thing I'm going to do is position them. The saliva is going to be absolutely positioned on top of the bored cat. Exactly at the bottom of the mouth.
import { useState, useEffect, useRef } from "react";
import { css } from "@emotion/react";

function DroolingCat() {
  return (
    <div
      css={css`
        position: relative;
      `}
    >
      // Saliva
      <svg
        css={css`
          position: absolute;
          top: 50%;
          margin-top: 17%;
          width: 18px;
          left: 50%;
          margin-left: -9px;
        `}
      />
      // Bored cat
      <svg />
    </div>
  );
}

export default DroolingCat;
The drooling cat effect
Having positioned the saliva, it's now time to create the first animation. The goal is to give the impression that the cat is drooling.
Firstly, I'm going to use the useRef hook to keep track of the position of the cat's mouth. Then I'm going to create a handleScroll function that will be called when the page is scrolled. Inside this function we need to detect if the cat's mouth is in the viewport. If it is, we will setSticky to false. If it is not, we will setSticky to true.
The saliva is supposed to become fixed to the top of the screen when the cat's mouth is out of viewport. As a result, we're going to update the styles based on the isSticky state.
Why am I not using the CSS position sticky if I'm calling the state isSticky? In case the parent element scrolls off the viewport, the element with position: sticky will leave the viewport as well and we don't want that. We want the saliva to stay fixed to the top of the viewport.
import { useState, useEffect, useRef } from "react";
import { css } from "@emotion/react";

function DroolingCat() {
  const [isSticky, setSticky] = useState(false);
  const mouthRef = useRef(null);

  useEffect(() => {
    window.addEventListener("scroll", handleScroll);
    return () => {
      window.removeEventListener("scroll", () => handleScroll);
    };
  }, []);

  const handleScroll = () => {
    if (
      mouthRef &&
      mouthRef.current &&
      mouthRef.current.getBoundingClientRect()
    ) {
      if (mouthRef.current.getBoundingClientRect().bottom <= 0) {
        setSticky(true);
      } else {
        setSticky(false);
      }
    }
  };

  return (
    <div>
      // Saliva
      <svg
        xmlns="http://www.w3.org/2000/svg"
        fill="none"
        viewBox="0 0 30 603"
        css={css`
          ${isSticky
            ? `position: fixed; top: 0;`
            : `position: absolute; top: 50%;  margin-top: 17%;`}
          width: 18px;
          left: 50%;
          margin-left: -9px;
        `}
      >
        // the mouth gets the ref from the mouthRef variable
        <path ref={mouthRef}></path>
      </svg>
      // Bored cat
      <svg />
    </div>
  );
}

export default DroolingCat;
The hover animation
It is now time to add the hover animation. Whenever the mouse enters or leaves the image, the cat's eyelids should change. When the mouse is hovering the cat, we set the isBored state to true. When the mouse leaves the cat, we set the isBored state to false.
The isBored state will determine which eyelids will be displayed inside the SVG. The "evil" eyelids will be displayed if the cat isBored. The "bored" eyelids will be displayed if the cat !isBored (it's not bored).
import { useState, useEffect, useRef } from "react";
import { css } from "@emotion/react";

function DroolingCat() {
  const [isBored, setIsBored] = useState(true);

  return (
    <div>
      // Bored cat
      <svg
        onMouseEnter={() => setIsBored(false)}
        onMouseLeave={() => setIsBored(true)}
      >
        {!isBored && (
          <>
            <path />
            <path />
          </>
        )}

        {isBored && <path />}
      </svg>
    </div>
  );
}

export default DroolingCat;
Putting it all together
In the following CodeSandbox, you can see how to put all the code together. All the animations can be seen in action by scrolling the page and hovering over the cat. Feel free to recreate this code with your design, and let me know by tweeting @miuki_miu! It would be great to see how you use it. That's all!